Sunday, March 16, 2014

Light, Airy, Lacy Poncho done in a V-Stitch pattern

Light and Lacy Poncho
.
Materials:
  • 5.00 mm hook
  • Medium weight yarn
  • Scissors

Stitches Used:
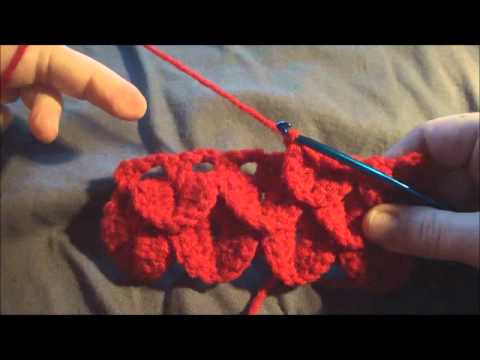
  • V-Stitch- work 1 double crochet stitch, chain 1 stitch, and work another double crochet stitch, all for a single stitch.
  • Single crochet Decrease(Sc dec):[Insert your hook into the next stitch.Yarn over (yo) and draw the yarn through the stitch.Insert your hook into the next stitch.Yarn over (yo) and draw the yarn through the stitch.Yarn over and draw the yarn through all 3 loops on your hook.]

Instructions:
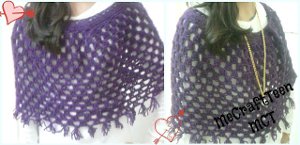
This pattern is for a small-medium size
  1. Chain 102
     
  2. Round 1: Sc all around. Slip Stitch to form a ring making sure not to twist
     
  3. Round 2: Ch 3(not counted as a stitch), Make a V-stitch
     
  4. Sk 2 Stitches and make a V-stitch in the 3rd Stitch. Continue all around(34 V-stitches)
     
  5. Sl st to the top of chain 3
     
  6. Round 3-20 : Ch 3 (not counted as a stitch), make a V-stitch in the same stitch.Sk 2 sts and make a V-stitch in the 3rd st and all around.
     
  7. Fasten off.
     
  8. Going back to the Sc round, attach a new strand.
     
  9. Ch 1 , Sc in the first stitch, Do a sc Dec in the next stitch. Continue all around.
     
  10. Fasten Off.

Fringe
  1. Cut the yarn into the required number of equal lengths.(I cut 4 strands in 6 cm each)
     
  2. Fold the strands of yarn for one fringe in half, forming a loop at one end.
     
  3. Take your hook and draw the loop through the stitch that you’re attaching the fringe to.
     
  4. Draw the loose ends of the yarn through the loop.
     
  5. Holding the top of the fringe in one hand, pull gently on the fringe ends with your other hand.
     
  6. To finish, trim the ends of the fringe so that they’re even.

Flower Dish Cloth


I thought this would be a great idea for many reasons. They would look very pretty in the kitchen and they are inexpensive as far as dish clothes goes. I think this is a great project to teach to my granddaughters. I will have to make a few as gifts.. my daughter is having twins and these will make nice baby wash clothes if made out of baby yarn! Maybe I will make some for a house warming gift.

     I made a couple of these, very pretty. However, I am looking for a different way of finishing them. It's a wash (dish) cloth and needs to stand up through use. I tried a slip stitch to come back up instead of cutting, but it did not lay right. I just think a lot of loose ends will cause it to unravel quicker. Any suggestions?

Crochet Flower Dish Cloths

MATERIALS
  •  Yarn: Lily® Sugar’n Cream® (Solids 70.9 g/2.5 oz, Ombres 56.7 g/2 oz)
VERSION 1:
Main Color (MC): (01628 Hot Orange) 1 ball
Contrast A: (00001 White) 1 ball
VERSION 2:
Main Color (MC): (00073 Sunshine) 1 ball
Contrast A: (02741 Playtime) 1 ball
VERSION 3:
Main Color (MC): (00073 Sunshine) 1 ball
Contrast A: (02743 Summer Splash) 1 ball
  • Crochet hook: Size 5 mm (U.S. H/8) crochet hook or size needed to obtain gauge.
Gauge: 13 sc and 14 rows = 4 ins [10 cm].
Size: Approx 10 ins [25.5 cm] in diameter.

Instructions:

Note: Ch 2 does not count as hdc in 1st to 3rd rnds.
With MC, ch 4. Join with sl st to first ch to form a ring.
1st rnd: Ch 2. 10 hdc in ring. Join with sl st to first hdc.
2nd rnd: Ch 2. 2 hdc in each hdc around. Join with sl st to first hdc. 20 hdc.
3rd rnd: Ch 2. 2 hdc in each hdc around. Join with sl st to first hdc. 40 hdc.
4th rnd: Ch 2. (1 hdc. Ch 1. 2 hdc) in same sp as sl st. *Miss next 2 hdc. (2 hdc. Ch 1. 2 hdc) in next hdc. Rep from * around. Join with sl st to top of ch 2.
5th rnd: Sl st in next st and ch-1 sp. Ch 2. (1 hdc. Ch 1. 2 hdc) in same ch-1 sp. *(2 hdc. Ch 1. 2 hdc) in next ch-1 sp – shell made. Rep from * around. Join with sl st to top of ch 2.
6th and 7th rnds: Sl st in next st and ch-1 sp. Ch 2. (2 hdc. Ch 1. 3 hdc) in same ch-1 sp. *(3 hdc. Ch 1. 3 hdc) in next ch-1 sp. Rep from * around. Join A with sl st to top of ch 2 at end of 7th rnd.
8th rnd: With A, ch 2. *8 dc in next ch-1 sp. 1 sc in sp between 2 shells. Rep from * around. Join with sl st to first dc.
9th rnd: Ch 1. *(1 sc in next dc. Ch 1) 8 times. (1 sc in sp between next 2 shells 1 row below. Ch 1) 4 times. 1 sc in same ch-1 sp as last sc. (Ch 1. 1 sc in sp between next 2 shells 1 row above) 4 times. Rep from * around. Join with sl st to first sc. Fasten off.


This is a nice tutorial for the v stitch. very detailed with photos.

Merry Messy Life

Crochet V-Stitch Tutorial


V Stitch

V Stitch Instructions

Completed Rows of Basic Crochet V StitchCompleted Rows of Basic Crochet V Stitch -- Photo © Michael Solovay
Multiple of 3 + 7 stitches.

Abbreviations:

Special Stitch: the V stitch. To complete each V stitch, work 1 dc st, 1 ch st, and 1 more dc st in the same chain or space. In this variation of the v stitch, you’ll stack rows and rows of v stitches on top of each other.
Crochet your starting chain.
Row 1: dc in 4th ch from hook. The last 3 chs counts as the 1st dc in the row. Ch 1, skip next ch, [dc in next ch, ch 1, dc in same ch. Skip next 2 chs.] Rep the sequence in brackets across the row. At the end of the row, ch 1, skip 2 chs, then work 1 dc in ea of the next 2 ch sts.
ch 3, turn.
Row 2: your turning chain counts as the first dc in the row. Dc in next dc. Ch 1, work 1 v st in ea v st across the row. Ch 1, skip next ch, work 1 dc in ea of the last 2 dc sts.
Rep row 2 until the piece reaches your expectations for being a good length, then end off and weave in your ends.
If you would like to see step-by-step photos showing you exactly how to work this stitch, scroll down past the ad block for the tutorial. Be sure to click each photo if you would like to see it enlarged.

Step by Step V Stitch Tutorial

Photo © Michael Solovay
Start by crocheting your foundation chain.


Photo © Michael Solovay
You'll work into the fourth chain stitch from your hook, which is the chain I'm indicating in this photo. See where my left thumb is pointing? That's the spot to work into.


Photo © Michael Solovay
Once you've worked your double crochet stitch into the 4th chain from hook, this is what it looks like. The first three chains in the row count as 1 double crochet. So you'll have two double crochet stitches, as pictured.


Photo © Michael Solovay
Chain 1...


Photo © Michael Solovay
Skip the next chain, and then work a double crochet stitch into the next chain stitch.


Photo © Michael Solovay
Chain 1.


Photo © Michael Solovay
Work another double crochet stitch into the same stitch where you worked the last one. One v stitch is completed.


Next, you're going to work another v stitch. Yarn over hook to begin the first double crochet in the v stitch...  Skip the next 2 chain stitches.  Complete the double crochet stitch.

Another great source for this, is a tutorial on My Merry Messy Life Has some good photos to follow along with..


Saturday, March 15, 2014

Crocodile Stitch Tutorial

Video:How to Crochet: Basic Crocodile Stitch

  This stitch is quickly gaining popularity. A very pretty and elegant stitch that looks nice in various patterns and with yarns. Here are a couple of video tutorials.I think the baby booties are absolutely cute.


One Perfect little Miracle


These are so cute. Would be fun to make. No pattern for this yet but I'm still searching.
Different spin on the Crocodile stitch


For the Beginner

Here is a great site I found for easy stitches and patterns for the beginners.
 She offers videos, instructions and downloads for different patterns

Beginner Crochet Patterns

Great Beanie Ide
And lots of Blankets